Driving the Robot
After completing the connections, it’s time to test the motors on the robot! This is mostly programming on the Arduino IDE.
First, we want to setup some variables so that it’s easy to refer to the pins on the Arduino as easy-to-remember motor pins:
#define leftMotorA 5
#define leftMotorB 6
#define leftMotorEnable 9

#define rightMotorA 7
#define rightMotorB 8
#define rightMotorEnable 10
Next, we specify that these pins are output pins in the Setup Function:
void setup() {
  pinMode(leftMotorA, OUTPUT);
  pinMode(leftMotorB, OUTPUT);
    pinMode(rightMotorA, OUTPUT);
  pinMode(rightMotorB, OUTPUT);
}
And finally, you follow the following pattern of code and play around to see what direction the wheels are turning in:
void loop() {
digitalWrite(leftMotorA, HIGH);
digitalWrite(leftMotorB, LOW);
digitalWrite(leftMotorEnable, HIGH);
  digitalWrite(rightMotorA, HIGH);
digitalWrite(rightMotorB, LOW);
digitalWrite(rightMotorEnable, HIGH);
}
By now, you should have already understood what to do. Upload the code to your Arduino board!
If your wheels are moving, GREAT JOB! That’s all for now. We can easily play around with the code to make the motors turn in the desired direction.
How the code works:
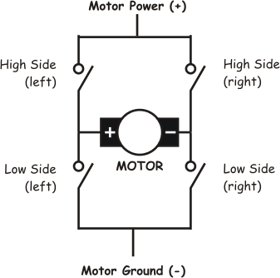
Remember this circuit? It’s an H-bridge. When you set it to HIGH-LOW (left to right), the motor spins in one direction. When you set it to LOW-HIGH (left to right), the motor spins in the other direction. The motor driver you are using has 2 H-bridges built inside of it which helps to control the direction of two DC Motors.
Let’s explain that in the Arduino language.
For the Left Motor on your robot, there are three important things to note:
digitalWrite(leftMotorA, HIGH);
digitalWrite(leftMotorB, LOW);
digitalWrite(leftMotorEnable, HIGH);
will turn the left motor forward.
digitalWrite(leftMotorA, LOW);
digitalWrite(leftMotorB, HIGH);
digitalWrite(leftMotorEnable, HIGH);
will turn the left motor in the opposite direction i.e. backward.
digitalWrite(leftMotorA, LOW);
digitalWrite(leftMotorB, HIGH);
digitalWrite(leftMotorEnable, LOW);
will do nothing, motor won’t spin. To make the motor turn, you need to set the enable pins to HIGH. If enable pin is low, motor won’t turn i.e. robot stops on that side.
For the Right Motor on your robot, there are the same three important things to note:
digitalWrite(rightMotorA, HIGH);
digitalWrite(rightMotorB, LOW);
digitalWrite(rightMotorEnable, HIGH);
will turn the right motor forward.
digitalWrite(rightMotorA, LOW);
digitalWrite(rightMotorB, HIGH);
digitalWrite(rightMotorEnable, HIGH);
will turn the right motor in the opposite direction i.e. backward.
digitalWrite(rightMotorA, LOW);
digitalWrite(rightMotorB, HIGH);
digitalWrite(rightMotorEnable, LOW);
will do nothing, motor won’t spin.
To make the motor turn, you need to set the enable pins to HIGH. If enable pin is low, motor won’t turn i.e. robot stops on that side.
Finally, combine the left motor and right motor code to create a forward movement routine as we saw in the example code:
digitalWrite(leftMotorA, HIGH);
digitalWrite(leftMotorB, LOW);
digitalWrite(leftMotorEnable, HIGH);
  digitalWrite(rightMotorA, HIGH);
digitalWrite(rightMotorB, LOW);
digitalWrite(rightMotorEnable, HIGH);
We will now learn about creating movement functions to easily create complex paths for the robot. It can be done very simply in two steps:
1) Define the movement function using void function_name() 2) Call the function in the main loop as shown below:
void loop(){
forward();
}

void forward(){
digitalWrite(leftMotorA, HIGH);
digitalWrite(leftMotorB, LOW);
digitalWrite(leftMotorEnable, HIGH);
  digitalWrite(rightMotorA, HIGH);
digitalWrite(rightMotorB, LOW);
digitalWrite(rightMotorEnable, HIGH);
}
CHALLENGES FOR YOU
1) Create your own movement functions for Left Turn, Right Turn, Backward and Stop.
Follow the template below to help you get started:
void loop(){
leftTurn();
}

void leftTurn(){
// Fill in the code for leftTurn
}
HINT
ONLY AFTER COMPLETING MOVEMENT FUNCTIONS
2) Try to combine these functions using delay so that you can create more interesting paths. Try making the robot go along a square, a rectangle, and a triangle.
Follow the template below to help you get started:
void loop(){
forward();
delay(1000); // go forward for 1 second
backward();
delay(1000); // go backward for 1 second
leftTurn();
delay(1000); // left Turn for 1 second
rightTurn();
delay(1000); // right Turn for 1 second
stop();
delay(100000000); // stop for a long time
}
Good luck! Have fun!